Vue3 基础
Vue 框架: 单页面应用
MVVM, Model-View-ViewModel 架构
- View 视图层
- ViewModel 例 .vue, .jsx, .tsx
- Model 数据层
使用 vscode 调试
// launch.json
{
  "version": "0.2.0",
  "configurations": [
    {
      "type": "chrome",
      "request": "launch",
      "name": "vue3: chrome",
      "url": "http://localhost:5173",
      "webRoot": "${workspaceFolder}/src"
    }
  ]
}Vue3 新特性
重写双向数据绑定
- vue2 的双向数据绑定基于 Object.defineProperty(); 创建一个 Vue 实例时, for..in 遍历 vm.data 中的所有属性, 使用 Object.defineProperty() 将属性转换为 getter 和 setter
- vue3 的双向数据绑定基于 Proxy 代理对象
优势
- 省略 for..in 遍历
- 可以监听数组的 length 属性, 数组的索引
- 可以监听新增属性操作, 删除属性操作
优化虚拟 DOM
- Vue2 中, 使用 diff 算法更新虚拟 DOM 时, 全量对比
- Vue3 中, 使用 diff 算法更新虚拟 DOM 时, 只对比有 Patch Flag 的节点
Vue3 Fragments
Vue3 允许组件有多个根节点, 支持 jsx, tsx
<template>
  <div>root1</div>
  <div>root2</div>
</template>render() {
return (
<>
<div>root1</div>
<div>root2</div>
</>
)
}Vue3 Tree shaking: 删除无用代码
创建 Vue3 项目
pnpm create vite@latest
pnpm create vue@latest # 推荐- public 下的静态文件, 不会被 vite 编译
- src/asset 下的静态文件, 会被 vite 编译
- src/App.vue Vue 应用的根组件
- src/main.ts Vue 应用的入口 JS/TS 文件, 导入 ./App.vue 根组件并创建 App 对象, 并挂载到 index.html, 也可以导入全局样式, 全局 api
- index.html Vue 应用的入口 HTML 文件,
<div id="app"></div>是 App 对象的挂载点
SFC
SFC, Single File Component 单文件组件
对于 .vue 文件
- script 标签: setup 只能有一个, 非 setup 可以有多个
- template 标签: 只能有一个
- style 标签: 可以有多个
TIP
配置 VSCode 代码片段
{
  "Vue3": {
    "prefix": "v3",
    "body": [
      "<script setup lang=\"ts\">",
      "",
      "</script>",
      "",
      "<template>",
      "  <main>",
      "",
      "  </main>",
      "</template>",
      "",
      "<style scoped lang=\"css\">",
      "",
      "</style>"
    ],
    "description": "Snippet (Composition API)"
  }
}风格指南
TIP
风格: Vue2 选项式 Option API
<script lang="ts">
export default {
  data() {
    return {
      cnt: 0,
    };
  },
  methods: {
    addCnt() {
      this.cnt++;
    },
  },
};
</script>TIP
风格: setup 函数
<script lang="ts">
import { ref } from "vue";

export default {
  setup() {
    const cnt = ref(1);
    const addCnt = () => {
      cnt.value++;
    };
    // 一定要 return
    return {
      cnt,
      addCnt,
    };
  },
};
</script>- 单向绑定: 模型 (数据) 改变 --> 视图 (页面) 改变. 例: 插值; v-bind 指令
- 双向绑定: 模型 (数据) 改变 <-> 视图 (页面) 改变. 例: v-model 指令, 常用于输入框
TIP
风格: setup 语法糖, 组合式 Composition API
<script lang="ts" setup>
import { ref } from "vue";
const cnt = ref(1);
const addCnt = () => {
  cnt.value++;
};
</script>vue 指令
- v-text 渲染文本, v-text 会覆盖子元素
- v-html 渲染 HTML, v-html 会覆盖子元素, 不支持 Vue 组件
- v-if, v-else-if, v-else 元素的条件渲染, 不渲染则将元素转换为注释节点
<!-- v-if -->, 操作 DOM - v-show 元素的显示/隐藏: 改变内联 CSS 样式
display: none, 操作 CSS - v-on 为元素绑定事件
- v-bind 为元素绑定属性, 模型到视图的单向绑定. v-bind 也可以绑定 style, 类似 jsx
- v-model 模型, 视图的双向绑定, 本质是 v-bind 和
v-on:[eventType]的语法糖 - v-for 遍历元素
- v-once 性能优化, 只渲染一次
- v-memo 性能优化, 缓存
CAUTION
v-on 可以简写为 @
v-bind 可以简写为 :
v-model 本质是 v-bind 和 v-on:[eventType] 的语法糖
<template>
  <input v-model="text" />
  <!-- 等价于 -->
  <input v-bind:value="text" @input="text = $event.target.value" />
  <!-- 等价于 -->
  <input :value="text" @input="(ev) => (text = ev.target.value)" />
</template><script lang="ts" setup>
const evType = ref("click");
function clickHandler(ev: Event) {
console.log("[Child] ev:", ev);
console.log("[Child] evType:", evType);
}
</script>
<template>
<!-- 动态事件名 -->
<!-- ev: PointerEvent -->
<!-- evType: click -->
<div
@click="
(ev) => {
console.log('[Parent] ev:', ev);
}
"
>
<button v-on:[evType]="clickHandler">点击</button>
<button @[evType]="(ev: Event) => clickHandler(ev)">点击</button>
<!-- 阻止事件冒泡 -->
<button @[evType].stop="clickHandler">点击</button>
</div>
</template>这里, 点击 button 子元素时, 事件会冒泡到 div 父元素, 触发 div 父元素的点击事件, 使用 .stop 修饰符阻止事件冒泡
TIP
事件传播分为 3 个阶段: 捕获阶段, 目标阶段和冒泡阶段
| v-on 指令的修饰符 | 原生 JS |
|---|---|
v-on:[evType].stop | ev.stopPropagation(); .stop 指令: 阻止事件冒泡 |
v-on:[evType].prevent | ev.preventDefault(); .prevent 指令: 阻止事件的默认行为 |
v-on:[evType].capture | elem.addEventListener(evType, listener, true /* useCapture */).capture 指令: 事件在捕获阶段触发, 而不是在默认的冒泡阶段触发 |
v-on:[evType].self | .self 指令: 只触发本元素绑定的事件, 不触发从子元素冒泡的事件 |
v-on:[evType].once | elem.removeEventListener(*args) .once 指令: 事件只触发一次, 触发后移除监听器 |
@scroll.passive | .passive 指令: 对于滚动, 触摸事件, 不调用 ev.preventDefault(), 提高流畅度 |
@keydown.enter | 键修饰符 Key Modifiers: 按 enter 键 |
@click.ctrl | 系统修饰符 System Modifiers: 按 ctrl 键并点击 |
<script lang="ts" setup>
const autofill = ref('')
function enterHandler(ev: Event) {
  console.log('[enterHandler] ev: ', ev)
  console.log('[enterHandler] autofill:', autofill)
  autofill.value = 'Autofill context'
}
</script>

<!-- v-model: 双向绑定 -->
<template>
  <input
    id="text"
    type="text"
    @keydown.enter="enterHandler"
    v-model="autofill"
    placeholder="按 enter 键自动填充"
  />
</template>Vue3.2 新增 v-memo
v-memo 接收一个依赖项数组, 元素或组件重新渲染时, 如果依赖项数组中的所有元素都未更新, 则跳过渲染, 通常 v-memo 与 v-for 配合使用. 依赖项数组为空时, v-memo="[]" 等价于 v-once
<script lang="ts" setup>
const cnt = ref(1);
const cnt2 = ref(1);
const addCnt = () => {
  cnt.value++;
};
const addCnt2 = () => {
  cnt2.value++;
};
</script>

<template>
  <!-- addCnt2 时, 该元素不会重新渲染 -->
  <div v-memo="[cnt]">cnt: {{ cnt }}; cnt2: {{ cnt2 }}</div>
  <button v-on:click="() => addCnt()">addCnt</button>
  <button @click="() => addCnt2()">addCnt2</button>
</template>虚拟 DOM 和 diff 算法
<!-- 真实 DOM -->
<div>
  <p></p>
</div>// 虚拟 DOM
import { createElementVNode, openBlock, createElementBlock } from "vue";
export function render(ctx, cache, $props, $setup, $data, $options) {
return (
openBlock(), createElementBlock("div", null, [createElementVNode("span")])
);
}真实 DOM 的属性过多, 操作真实 DOM 浪费性能, 虚拟 DOM 是 JS 对象
const div = document.createElement("div");
let str = "";
for (const key in div) {
  str += key + " ";
}
console.log(str);IMPORTANT
diff 算法
- 没有 key: 替换, 新增, 删除性能差
- 有 key: 性能好
vnode: Virtual DOM Node
- 从头到尾对比 vnode 类型和 key, 不同则 break, 转到 2
- 从尾到头对比 vnode 类型和 key, 不同则 break, 转到 3
- 如果旧节点全部 patch, 有多余的新节点, 则挂载
- 如果新节点全部 patch, 有多余的旧节点, 则卸载
- 特殊情况: 乱序 (基于最长递增子序列 LIS)
原序列 2,3,4,0,6,1 的最长递增子序列为 2,3,4. 将原 vnode 序列的最长递增子序列作为参照序列, 移动不在参照序列中的节点
- 错误实践: 使用索引 index (拼接其他值) 作为 key
- 正确实践: 使用唯一值 id 作为 key
<script lang="ts" setup>
const arr = ref<string[]>(["a", "b", "c", "d"]);
</script>

<template>
  <!-- eslint-disable-next-line vue/require-v-for-key -->
  <span v-for="val of arr">
    <!-- 没有 key -->
    {{ val }}
  </span>
  <br />

  <span :key="idx" v-for="(val, idx) of arr">
    <!-- 有 key -->
    {{ val }}
  </span>
  <br />

  <button @click="(console.log($event), arr.splice(2, 0, 'e'))">splice</button>
</template>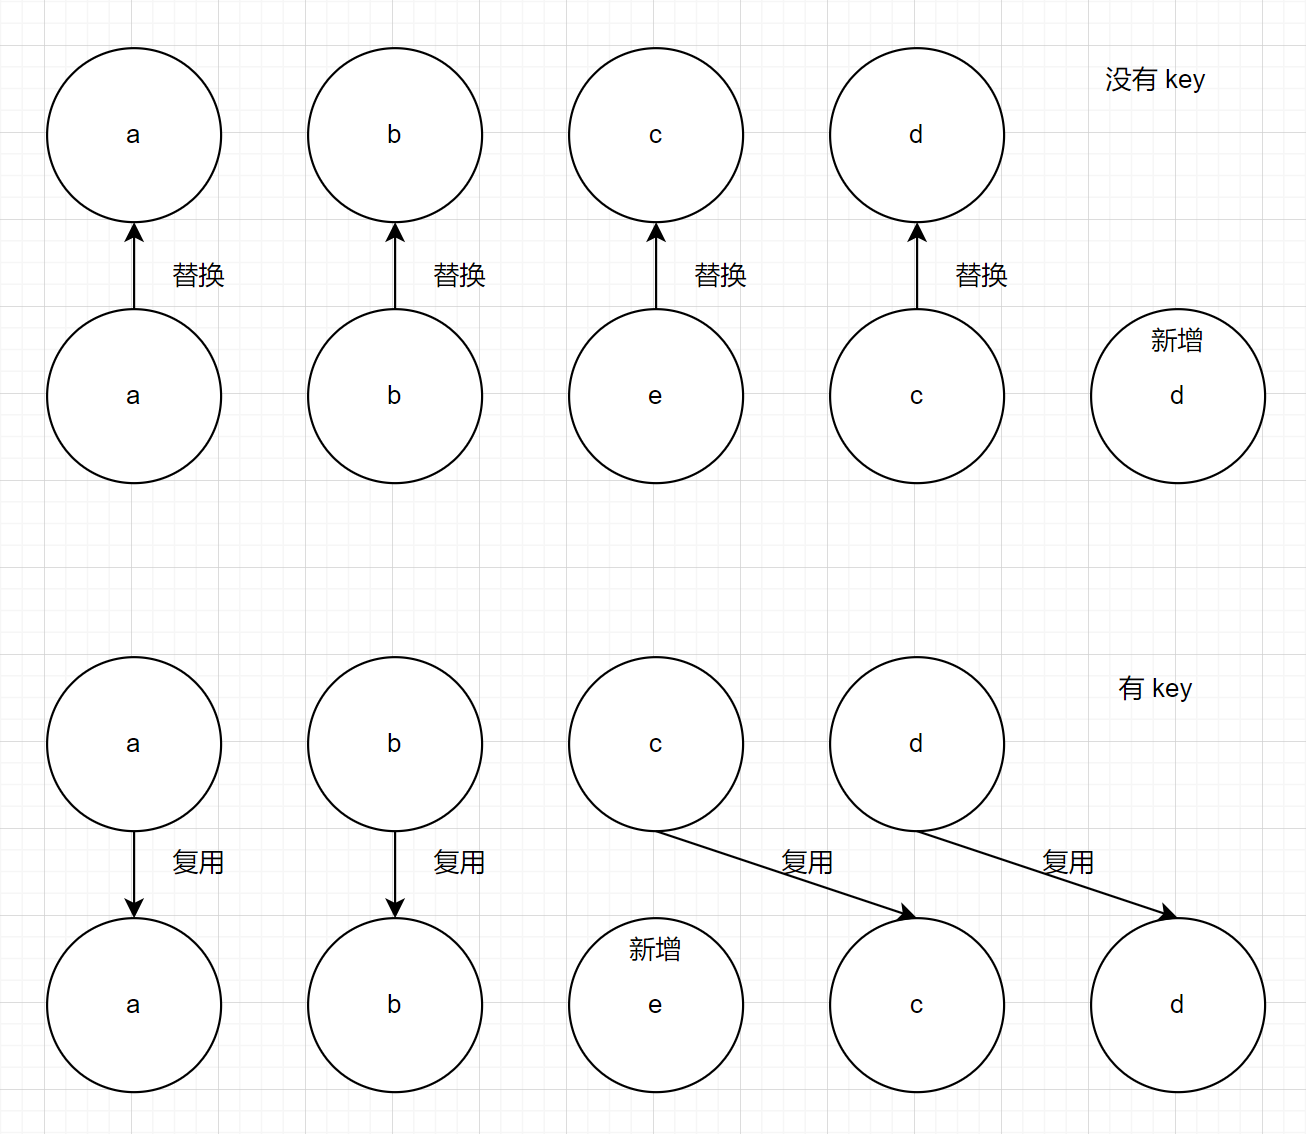
ref, shallowRef, isRef, triggerRef, customRef
TIP
Vitest vitest --run --testNamePattern=TestSuiteName.testCaseName <TestFileRelativePath> 检查 -> 设置 -> 偏好设置 -> 控制台 -> 自定义格式设置工具
回顾 Vue2
export default {
  data() {
    return {
      // 响应式对象
      age: 22,
    };
  },
};- ref 深层响应式
- shallowRef 浅层响应式
- isRef 判断是否为使用 ref, shallowRef 创建的响应式对象
isRef(refObj), isRef(shallowRefObj)返回 trueisRef(reactiveObj), isRef(shallowReactiveObj)返回 false
- triggerRef 调用 triggerRef 强制触发深度响应式,
shallowRef + triggerRef等价于ref
同时使用 ref/reactive 和 shallowRef/shallowReactive 时, shallowRef/shallowReactive 会表现的像深层响应式
CAUTION
Vue 组件的 ref/reactive 依赖改变时, 会更新整个 template vuejs/core #10680
class RefImpl {
  set value(newVal) {
    // ...
    triggerRefValue(this, newVal); // 触发深度响应式
  }

  export function triggerRef(ref: Ref) {
    triggerRefValue(...args); // 触发深度响应式
  }
}ref 绑定 DOM 元素
<script lang="ts" setup>
const divRef = ref<HTMLDivElement>();
onMounted(() => {
  console.log(divRef.value?.innerText);
});
</script>

<template>
  <div ref="divRef">ref 绑定 DOM 元素</div>
</template>customRef
function customRefFactory<T>(val: T, timeout: number) {
  let timer: any;
  const myRef: ReturnType<typeof customRef> = customRef(
    (
      track: () => void /** 收集依赖 */,
      trigger: () => void /** 触发更新 */,
    ) => {
      return {
        get: () => {
          track();
          return val;
        },
        set: (newVal: T) => {
          clearTimeout(timer);
          timer = setTimeout(() => {
            val = newVal;
            trigger();
            timer = null;
          }, timeout);
        },
      };
    },
  );
  return myRef;
}reactive, shallowReactive
reactive 返回一个代理对象, 不能对该代理对象 itemsProxy 直接赋值, 否则会失去响应式
ref 可以用于引用数据类型, 也可以用于基本数据类型; reactive 只能用于引用数据类型
ref 访问, 修改响应式对象的值时需要加 .value; reactive 不需要
ref 更适合简单类型; reactive 更适合复杂类型
reactive 深层响应式
shallowReactive 浅层响应式
同时使用 ref/reactive 和 shallowRef/shallowReactive 时, shallowRef/shallowReactive 会表现的像深层响应式
readonly
返回一个只读的响应式对象
const itemsProxy = reactive<string[]>([]);
const readonlyItemsProxy = readonly(itemsProxy);
readonlyItemsProxy.push("item");
// Reactive<Array(0)>
// Reactive<Array(0)> (readonly)
console.log(itemsProxy, readonlyItemsProxy);
itemsProxy.push("item");
// Reactive<Array(1)>
// Reactive<Array(1)> (readonly)
console.log(itemsProxy, readonlyItemsProxy);toRef, toRefs, toRaw
- toRef, toRefs 将 refObj.value 或 reactiveObj 的属性转换为响应式对象
- 直接解构会失去响应式, 使用 toRefs 解构可以保留响应式
- toRaw: 将 refObj.value 或 reactiveObj 转换为普通对象
<script lang="ts" setup>
const obj = { name: "whoami", age: 1 };
// 错误实践: toRef, toRefs 一个普通对象
const age = toRef(obj /** 对象 */, "age" /** 对象的 key */);

const obj2 = ref({ name: "whoami2", age: 2 });
const _age2 = toRef(obj2.value, "age");
const { name: name2, age: age2 } = toRefs(obj2.value);

const obj3 = reactive({ name: "whoami3", age: 3 });
const _age3 = toRef(obj3, "age");
const { name: name3, age: age3 } = toRefs(obj3);

// {name: 'whoami', age: 1} {name: 'whoami', age: 1}
console.log(obj, toRaw(obj));
// Ref<Object> Reactive<Object> {name: 'whoami2', age: 2}
console.log(obj2, obj2.value, toRaw(obj2.value));
// Reactive<Object> {name: 'whoami3', age: 3}
console.log(obj3, toRaw(obj3));
</script>

<template>
  <!-- 错误实践: toRef, toRefs 一个普通对象,
   响应式对象 age 值更新, 视图不会更新 (没有 track, trigger)  -->
  <p>{{ obj }}</p>
  <p>{{ age }}</p>

  <!-- toRef, toRefs 一个 ref/reactive 对象,
   响应式对象 name2, _age2, age 值更新, 视图也会更新 (有 track, trigger)   -->
  <p>{{ obj2 }}</p>
  <p>{{ `${name2} ${_age2} ${age2}` }}</p>
  <p>{{ obj3 }}</p>
  <p>{{ `${name3} ${_age3} ${age3}` }}</p>
</template>TIP
get value() { track(); /** 跟踪依赖 */} 和 set value(newVal) { trigger(); /** 触发更新 */} 以更新视图
响应式原理
computed 计算属性
- 计算属性
computed({ getter, setter }) - 只读的计算属性
computed(getter) - 计算属性 computed(getter) 会缓存计算结果, 只有依赖项更新时, 才会重新计算 (脏值检测)
- 直接调用 getter 不会缓存计算结果, 每次重新渲染 template 时, 都会重新计算
const firstName = ref("Tiancheng");
const lastName = ref("Hang");
const fullName = computed<string>({
  get() {
    return firstName.value + "-" + lastName.value;
  },
  set(newVal: string) {
    [firstName.value, lastName.value] = newVal.split("-");
  },
});

const readonlyFullName = computed<string>(
  () => firstName.value + "- " + lastName.value,
);watch 侦听器
watch
- 侦听 ref 创建的响应式对象, 默认浅层侦听 (侦听原始值的地址, deep: false 或 deep: 0)
deep: true开启深层侦听, 性能很差- deep 也可以是一个数字, 表示最大侦听深度
- 默认
deep: 0, 表示侦听原始值的地址 (即 .value 这一层) deep: 1, 表示最大侦听深度为 1 (即 .value.propName 这一层)
- 侦听 reactive 创建的响应式对象, 默认开启深度侦听 (deep: true), 性能很差
- 当原始值的地址没有改变时, 回调函数中 newVal === oldVal === 当前响应式对象的值 (ref.value, reactive)
- 可以通过传递一个 getter, 侦听 reactive 创建的响应式对象中指定的属性
- 回调函数的参数 newVal, oldVal; 可选参数 onCleanup, 先执行, 等价于
onWatcherCleanup - 回调函数默认懒执行
- 默认
immediate: false, 即懒执行 callback immediate: true, 即立即执行 callback, 此时 oldVal === undefined
- 默认
- options
- deep 见 1
- immediate 见 6
- flush
- 默认
flush: 'pre'组件挂载/更新前触发 callback flush: 'sync'同步触发 callbackflush: 'post'组件挂载/更新后触发 callback
- 默认
once: true一次性侦听器, callback 只触发一次- 调试选项 onTrigger, onTrack 例
onTrigger(ev) { debugger }
- watch 可以返回停止侦听的函数
watchEffect
- watchEffect 只能浅层侦听
- watchEffect 自动侦听 (自动跟踪回调函数中的响应式依赖), 不需要指定 sources
- 可以指定侦听的深层属性
ref.value.propName; reactive.propName, 模拟深层侦听 - 回调函数的可选参数 onCleanup, 先执行, 等价于
onWatcherCleanup - 回调函数默认立即执行
- options
- flush: 同 watch
- 调试选项 onTrigger, onTrack: 同 watch
- watchEffect 可以返回停止侦听的函数 unwatch
总结: 未指定 deep 时, 地址改变则可以侦听到, 地址未改变则侦听不到
生命周期
setup 语法糖中, 将 beforeCreate, created 合并为 setup onXxx(() => { /** ... */ })
- setup 创建阶段
- onBeforeMount 挂载前, 获取不到 DOM
- onMounted 挂载后, 可以获取到 DOM
- onRenderTriggered 触发更新后, 回调函数中可以传递一个事件对象, 可以同时获取到 newValue 和 oldValue, 调试用 hook, 不属于组件生命周期
- onBeforeUpdate 更新前, 获取的是 oldValue
- onRenderTracked 跟踪依赖后, 回调函数中可以传递一个事件对象, 只能获取到 newValue, 调试用 hook, 不属于组件生命周期
- onUpdated 更新后, 获取的是 newValue
- onBeforeUnmount 卸载前, 可以获取到 DOM
- onUnmounted 卸载后, 获取不到 DOM
父子组件传参
WARNING
- 可以通过 $attrs 或 useAttrs() 获取组件上的所有属性
- 可以通过 $refs 获取引用的所有子组件暴露的接口的集合
- 可以通过 $parent 获取父组件暴露的接口
父传子
TIP
子组件中使用宏函数 defineProps 定义自定义属性
父组件
<script lang="ts" setup>
// 父子组件传参
const refStr_ = ref("Reactive Str From Parent");
const reactiveArr_ = reactive([6, 6, 6]);
</script>

<template>
  <!-- str 使用默认值 -->
  <ChildDemo :refStr="refStr_" :reactiveArr="reactiveArr_" />
  <ChildDemo
    str="Str From Parent"
    :refStr="refStr_"
    :reactiveArr="reactiveArr_"
  />
  <!-- 是响应式的 -->
  <button @click="refStr_ += '!'">changeRefStr</button>
  <button @click="reactiveArr_.push(6)">changeReactiveArr</button>
</template>子组件
<script lang="ts" setup>
const props = defineProps(["str", "refStr", "reactiveArr"]);
console.log(props.str, props.refStr, props.reactiveArr);
</script>

<template>
  <ul>
    <!-- template 中, 使用 props.propName 或直接使用 propName 都可以 -->
    <li>str: {{ props.str }}</li>
    <li>refStr: {{ refStr }}</li>
    <li>reactiveArr: {{ reactiveArr }}</li>
  </ul>
</template><script lang="ts" setup>
const props = defineProps({
str: {
type: String,
default: "Default str",
},
refStr: {
type: String,
default: "Default refStr",
},
reactiveArr: {
type: Array<number>, // Array
default: () => [1, 2, 3], // 引用类型必须转换为箭头函数
},
});
console.log(props.str, props.refStr, props.reactiveArr);
</script><script lang="ts" setup>
const props = defineProps<{
str?: string;
refStr?: string;
reactiveArr?: number[];
}>();
console.log(props.str, props.refStr, props.reactiveArr);
</script><script lang="ts" setup>
const props = withDefaults(
defineProps<{
str?: string;
refStr?: string;
reactiveArr?: number[];
}>(),
{
str: "Default str",
refStr: "Default refStr",
reactiveArr: () => [1, 2, 3], // 引用类型必须转换为箭头函数
}
);
console.log(props.str, props.refStr, props.reactiveArr);
</script>Grandparent 传 Child
可以通过 $attrs 或 useAttrs() 获取组件上的所有属性
<script lang="ts" setup>
const a = ref(1);
const b = reactive({ v: 2 });
function addA(da: number) {
  a.value += da;
}
</script>

<template>
  <div>
    <h1>$attrs, useAttrs</h1>
    <!-- v-bind="{ p1: "v1", p2: "v2" }" 等价于 :p1="v1" :p2="v2" -->
    <ParentDemo
      :a="a"
      :b="b"
      :addA="addA"
      :="{ p1: 'v1', p2: 'v2' }"
    ></ParentDemo>
  </div>
</template><script lang="ts" setup>
const attrs = useAttrs();
</script>
<template>
<div>
<div>$attrs: {{ $attrs }}</div>
<!-- $attrs === attrs: false -->
<div>attrs: {{ attrs }}, $attrs === attrs: {{ $attrs === attrs }}</div>
<ChildDemo :="$attrs"></ChildDemo>
<ChildDemo :="attrs"></ChildDemo>
</div>
</template><script lang="ts" setup>
defineProps(["a", "b", "addA", "p1", "p2"]);
</script>
<template>
<div>
<p>a={{ a }} b={{ b }} p1={{ p1 }} p2={{ p2 }}</p>
<button @click="addA(1)">Add grandparent's a</button>
</div>
</template>子传父
TIP
- 子组件中使用 defineEmits 定义自定义事件
- 子组件触发自定义事件, 向父组件发射参数
- 父组件中, 为子组件的自定义事件绑定回调函数, 接收自定义事件发生时, 子组件发射的参数
子组件
<script lang="ts" setup>
// 自定义事件名 evName, evName2 会被自动转换为 ev-name, ev-name2
const emit = defineEmits(["evName", "evName2"]);

function txToParent(ev: Event) {
  emit('evName', ev)
}
function txToParent2() {
  emit('evName2', 'foo', 'bar')
}
</script>

<template>
  <button @click="(ev) => txToParent(ev)">子传父</button>
  <button @click="txToParent2">子传父2</button>
</template><script lang="ts" setup>
// 自定义事件名 evName, evName2 会被自动转换为 ev-name, ev-name2
const emit = defineEmits<{
(e: 'evName', arg: Event): void, // 范型中必须使用 : 不能使用 =>
(e: 'evName2', arg: string, arg2: string): void
}>()
function txToParent(ev: Event) {
emit('evName', ev)
}
function txToParent2() {
emit('evName2', 'foo', 'bar')
}
</script>
<template>
<button @click="(ev) => txToParent(ev)">子传父</button>
<button @click="txToParent2">子传父2</button>
</template><script lang="ts" setup>
// 自定义事件名 evName, evName2 会被自动转换为 ev-name, ev-name2
const emit = defineEmits<{
evName: [arg: Event],
evName2: [arg: string, arg2: string]
}>()
function txToParent(ev: Event) {
emit('evName', ev)
}
function txToParent2() {
emit('evName2', 'foo', 'bar')
}
</script>
<template>
<button @click="(ev) => txToParent(ev)">子传父</button>
<button @click="txToParent2">子传父2</button>
</template>父组件
<script lang="ts" setup>
// 子传父
function rxFromChild(...args: any[]) {
  console.log(args);
}
</script>

<template>
  <ChildDemo
    @ev-name="(...args) => rxFromChild(args)"
    @ev-name2="rxFromChild"
  ></ChildDemo>
</template>组件暴露接口
TIP
子组件使用 defineExpose 暴露接口, 包括属性和方法
<script lang="ts" setup>
defineExpose({
  name: "Tiancheng",
  getAge() {
    return 23;
  },
});
</script><script lang="ts" setup>
const refName = ref<InstanceType<typeof DefineExposeDemo>>();
onMounted(() => {
console.log("[defineExpose]", refName.value?.name, refName.value?.getAge());
});
</script>
<template>
<DefineExposeDemo ref="refName" />
</template>- 可以通过
$refs获取引用的所有子组件暴露的接口的集合$refs = { refName: { prop: val } } - 可以通过
$parent获取父组件暴露的接口$parent = { prop: val }
<script lang="ts" setup>
let toy = ref("SnowWhite");
let age = ref(3);

defineExpose({ toy, age });

// $parent Proxy{ age }
function subAge(parent: any) {
  parent.age--;
}
</script>

<template>
  <button @click="subAge($parent)">parent.age--</button>
</template><script lang="ts" setup>
let computer = ref("Lenovo");
let age = ref(5);
defineExpose({ computer, age });
// $parent Proxy{ age }
function addAge(parent: any) {
parent.age++;
}
</script>
<template>
<button @click="addAge($parent)">parent.age++</button>
</template><script lang="ts" setup>
let age = ref(35);
let girlInstance: Ref<any> = ref();
let boyInstance: Ref<any> = ref();
function changeToy() {
girlInstance.value.toy += "!";
}
function changeComputer() {
boyInstance.value.computer += "!";
}
// $refs: Proxy{ girlInstance: { age, toy }, boyInstance: { age, computer } }
function addAge(refs: { [key: string]: any }) {
for (let prop in refs) {
console.log(prop); // boyInstance, girlInstance
refs[prop].age++;
}
}
defineExpose({ age });
</script>
<template>
<div class="parent">
<button @click="changeToy">change girl's toy</button>
<button @click="changeComputer">change boy's computer</button>
<!-- $refs -->
<button @click="addAge($refs)">children.age++</button>
<Girl ref="girlInstance" />
<Boy ref="boyInstance" />
</div>
</template>CAUTION
宏函数
- 宏函数只能在 setup 代码块中使用
- 宏函数不需要显式导入
- 宏函数 defineProps 编译时执行, 编译为组件的 props
经典错误
<script lang="ts" setup>
const { list } = toRefs(defineProps<{ list: { h: number; bg: string }[] }>());
console.log(list.value);
</script>全局组件, 局部组件, 递归组件
局部组件
- 在 XxxYxx.vue 中 import 导入的组件, 默认是局部组件
- 在 main.ts 中 import 导入的组件, 注册为是全局组件 (全局导入)
// main.ts
import GlobalComponent from "./components/example/GlobalComponent.vue";
const app = createApp(App);
app.component("CardComponent", GlobalComponent); // 注册为 CardComponent 全局组件批量注册全局组件
// main.ts
import * as GlobalComponents from "./components/global";

const app = createApp(App);
for (const [key, component] of Object.entries(GlobalComponents)) {
  app.component(key, component);
}递归组件
父组件 RecursiveParent.vue
<script lang="ts" setup>
const data = reactive<TreeNode[]>([
  { name: "1", checked: false },
  { name: "2", checked: false, children: [{ name: "2.1", checked: false }] },
  {
    name: "3",
    checked: false,
    children: [
      {
        name: "3.1",
        checked: false,
        children: [{ name: "3.1.1", checked: false }],
      },
    ],
  },
]);
</script>

<template>
  <div>
    <RecursiveChild :data="data"></RecursiveChild>
  </div>
</template>递归子组件 RecursiveChild.vue
<script lang="ts">
export default {
  name: "RecursiveChild", // 也可以自定义组件名
};
</script>

<script lang="ts" setup>
defineProps<{
  data?: TreeNode[]; // template 中可以直接使用 data
}>();
</script>

<template>
  <div>
    <div v-for="(item, idx) of data" :key="idx">
      <div>
        <input type="checkbox" v-model="item.checked" />
        <span>{{ item.name }}</span>
      </div>
      <!-- 递归组件, 默认组件名等于文件名 -->
      <RecursiveChild
        v-if="item.children?.length"
        :data="item.children"
      ></RecursiveChild>
    </div>
  </div>
</template>defineOptions 宏函数
CAUTION
- Vue3.3+ 已内置 defineOptions 宏函数, 可以直接使用
- 不能同时使用 defineOptions 宏函数和 export default 默认导出
pnpm i unplugin-vue-define-optionsvite.config.ts 中使用 unplugin-vue-define-options 插件
import defineOptions from "unplugin-vue-define-options/vite";
// https://vite.dev/config/
export default defineConfig({
  plugins: [vue(), vueJsx(), vueDevTools(), defineOptions()],
});tsconfig.json 中, 包括插件的 .d.ts 类型声明文件
{
  "compilerOptions": {
    "types": ["unplugin-vue-define-options/macros-global"]
  }
}现在可以使用 defineOptions 宏函数自定义组件名 (Vue3.3+ 已内置 defineOptions 宏函数, 可以直接使用)
// unplugin-vue-define-options
defineOptions({
  name: "RecursiveChild",
});WARNING
使用递归组件时, 需要阻止事件冒泡 (使用 .stop 修饰符)
<script lang="ts" setup>
defineProps<{
  data?: TreeNode[]; // template 中可以直接使用 data
}>();

function clickTap(item: TreeNode) {
  console.log(item);
}
</script>

<template>
  <div>
    <div @click="clickTap(item)" v-for="(item, idx) of data" :key="idx">
      <!-- .stop 修饰符: 阻止事件冒泡 -->
    <div @click.stop="clickTap(item)" v-for="(item, idx) of data" :key="idx">
      <div>
        <input type="checkbox" v-model="item.checked" />
        <span>{{ item.name }}</span>
      </div>
      <RecursiveChild v-if="item.children?.length" :data="item.children"></RecursiveChild>
    </div>
  </div>
</template>动态组件
多个组件使用同一个挂载点, 并可以动态切换
动态组件的应用场景: tab 页切换
<component :is="shallowRefComponent"></component>
不要创建组件的 ref 对象, 使用 markRaw 标记组件, 或使用 shallowRef 代替 ref 避免不必要的性能开销
<script lang="ts" setup>
import DynamicA from "./DynamicA.vue";
import DynamicB from "./DynamicB.vue";
import DynamicC from "./DynamicC.vue";
const active = ref(0);
// 不要创建组件的 ref 对象, 使用 markRaw 标记组件, 或使用 shallowRef 代替 ref 避免不必要的性能开销
// const dynamicItem = ref(DynamicA) [!code --]
const dynamicItem = shallowRef<typeof DynamicA>(DynamicA);

function onClick(com: typeof DynamicA, idx: number) {
  active.value = idx;
  dynamicItem.value = com;
}
const items = reactive([
  { name: "TabA", onClick: (idx: number) => onClick(DynamicA, idx) },
  { name: "TabB", onClick: (idx: number) => onClick(DynamicB, idx) },
  // markRaw 设置 __skip__ = true, 跳过 proxy 代理, 这里是可选的
  { name: "TabC", onClick: (idx: number) => onClick(markRaw(DynamicC), idx) },
]);
</script>

<template>
  <div style="display: flex">
    <!-- 同时有静态 class 和 动态 :class 时, 动态 :class 必须是一个类名数组 -->
    <div
      class="tab"
      :class="[active === idx ? 'active' : '']"
      v-for="(item, idx) of items"
      :key="idx"
    >
      <div @click="((active = idx), item.onClick())">{{ item.name }}</div>
    </div>
  </div>
  <component :is="dynamicItem"></component>
</template><script lang="ts" setup>
const active = ref(0);
function onClick(com: string, idx: number) {
active.value = idx;
dynamicItem.value = com;
}
const items = reactive([
{ name: "TabA", onClick: (idx: number) => onClick("DynamicA", idx) }, // 使用组件名
{ name: "TabB", onClick: (idx: number) => onClick("DynamicB", idx) },
{ name: "TabC", onClick: (idx: number) => onClick("DynamicC", idx) },
]);
</script>
<script lang="ts">
import DynamicA from "./DynamicA.vue";
import DynamicB from "./DynamicB.vue";
import DynamicC from "./DynamicC.vue";
export default {
// 注册子组件
components: {
DynamicA: DynamicA,
DynamicB /** DynamicB: DynamicB */,
DynamicC,
},
};
</script><script lang="ts" setup>
import DynamicA from "./DynamicA.vue";
import DynamicB from "./DynamicB.vue";
import DynamicC from "./DynamicC.vue";
defineOptions({
// 注册子组件
components: {
DynamicA: DynamicA,
DynamicB,
DynamicC,
},
});
const dynamicItem = shallowRef<string>("DynamicA");
function onClick(com: string, idx: number) {
active.value = idx;
dynamicItem.value = com;
}
const items = reactive([
{ name: "TabA", onClick: (idx: number) => onClick("DynamicA", idx) }, // 使用组件名
{ name: "TabB", onClick: (idx: number) => onClick("DynamicB", idx) },
{ name: "TabC", onClick: (idx: number) => onClick("DynamicC", idx) },
]);
</script>插槽 slot
插槽: 子组件提供给父组件的占位符, 可以插入父组件的 template
- 匿名插槽 default
- 具名插槽
- 作用域插槽
- 动态插槽
<script lang="ts" setup>
const items = reactive([
  { name: 'foo', age: 1 },
  { name: 'bar', age: 2 },
  { name: 'baz', age: 3 },
])
</script>

<template>
  <div>
    <header>
      <!-- 匿名插槽 -->
      <slot>匿名插槽</slot>
    </header>
    <main>
      <div v-for="(item, idx) of items" :key="idx">
        <!-- 作用域插槽 -->
        <slot name="main" :item="item" :idx="idx">作用域插槽</slot>
      </div>
    </main>
    <footer>
      <!-- 具名插槽 -->
      <slot name="footer">具名插槽</slot>
    </footer>
  </div>
</template><script lang="ts" setup>
import SlotChild from "./SlotChild.vue";
</script>
<template>
<div>
<!-- 子组件 -->
<SlotChild>
<!-- <div>默认插入到子组件的匿名插槽</div> -->
<template v-slot:default>
<div>插入到子组件的匿名插槽 default</div>
</template>
<template v-slot:main="{ item, idx }">
<div>插入到子组件的作用域插槽 main</div>
<div>{{ `idx: ${idx}, name: ${item.name}, age: ${item.age}` }}</div>
</template>
<template #footer>
<div>插入到子组件的具名插槽 footer, v-slot 等价于 #</div>
</template>
</SlotChild>
</div>
</template><script lang="ts" setup>
import SlotChild from "./SlotChild.vue";
const slotName = ref("default");
</script>
<template>
<div>
<SlotChild>
<!-- 动态插槽, 等价于 #[slotName] -->
<template v-slot:[slotName]>
<div>Dynamic Slot</div>
</template>
</SlotChild>
<button @click="slotName = 'default'">default</button>
<button @click="slotName = 'main'">main</button>
<button @click="slotName = 'footer'">footer</button>
</div>
</template>异步组件 Suspense
- 有异步 setup 钩子的组件: setup 语法糖中使用顶层 await, 会编译为
async setup() - Suspense 等待: 有异步 setup 钩子的组件, 或使用 defineAsyncComponent 定义的异步组件
- Suspense 组件有两个插槽: #default 和 #fallback, 两个插槽都只允许一个直接子节点, 尽可能显示 #default 插槽中的节点, 否则显示 #fallback 插槽中的节点
xhr.readyState
- 未调用 send 方法
- 正在执行 send 方法
- send 方法执行完成
- 正在解析响应
- 响应解析完成
// 原生 AJAX
export const myAxios = {
  get<T>(url: string): Promise<T> {
    return new Promise((resolve) => {
      const xhr = new XMLHttpRequest();
      xhr.open("GET", url);
      xhr.onreadystatechange = () => {
        if (xhr.readyState === 4 && xhr.status === 200) {
          setTimeout(() => {
            resolve(JSON.parse(xhr.responseText));
          }, 3000);
        }
      };
      xhr.send(null);
    });
  },
};<script lang="ts" setup>
import { myAxios } from "@/utils/axios.ts";
// setup 语法糖中使用顶层 await, 会编译为 async setup()
const {
characters: [albedo],
} = await myAxios.get<{ characters: Array<any> }>("./genshin-data.json");
</script>
<template>
<em>Suspense Async</em>
<div>name: {{ albedo.name }}</div>
<div>description: {{ albedo.description }}</div>
</template><template>
<em>Suspense Skeleton</em>
<div>请求中...</div>
</template><script lang="ts" setup>
import SuspenseSkeleton from "./components/SuspenseSkeleton.vue";
// 使用 defineAsyncComponent 定义的异步组件
const SuspenseAsync = defineAsyncComponent(
  () => import("./components/SuspenseAsync.vue"),
);
</script>
<template>
<Suspense>
<template #default>
<SuspenseAsync />
</template>
<template v-slot:fallback>
<SuspenseSkeleton />
</template>
</Suspense>
</template>defineAsyncComponent
const SuspenseAsync = defineAsyncComponent(
() => import("./components/SuspenseAsync.vue"),
);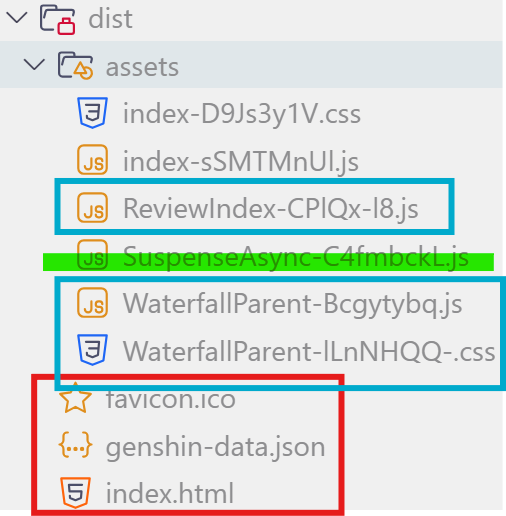
- 红色: public 目录下, 不打包
- 蓝色: 异步导入的路由组件, 分开打包
- 绿色: 异步组件, 分开打包, 懒加载
Teleport 传送模板
Teleport 将部分 template 传送到指定元素下, 成为指定元素的「直接子元素」
<script lang="ts" setup>
const showPopup = ref(false);
const showPopup2 = ref(false);
</script><template>
<button @click="showPopup = true">
显示弹窗 (Teleport + absolute 绝对定位)
</button>
<button @click="showPopup2 = true">显示弹窗2 (fixed 固定定位)</button>
<!-- popup 是 body 的直接子元素 -->
<Teleport to="body" :disabled="false">
<!-- to="选择器" -->
<!-- disable 是否禁用 Teleport 传送 -->
<div class="popup" v-show="showPopup">
<button @click="showPopup = false">隐藏弹窗</button>
</div>
<div>我也是 body 的直接子元素</div>
</Teleport>
<!-- popup2 是 #app 的直接子元素 -->
<div class="popup2" v-show="showPopup2">
<button @click="showPopup2 = false">隐藏弹窗2</button>
</div>
</template><style lang="css" scoped>
/** 如果没有 relative 相对定位的父元素, 则 absolute 绝对定位参考 body 元素定位 */
/** 如果有 relative 相对定位的父元素, 则 absolute 绝对定位参考该父元素 */
/** fixed 固定定位, 参考视口; relative 相对定位, 参考原位置 */
/** 解决 1: absolute 绝对定位, 并使用 Teleport 将部分 template 传送到 body 元素下 */
/** 解决 2: fixed 固定定位 (实际上更好) */
.popup {
position: absolute;
background: lightblue;
}
.popup2 {
position: fixed;
background: lightpink;
}
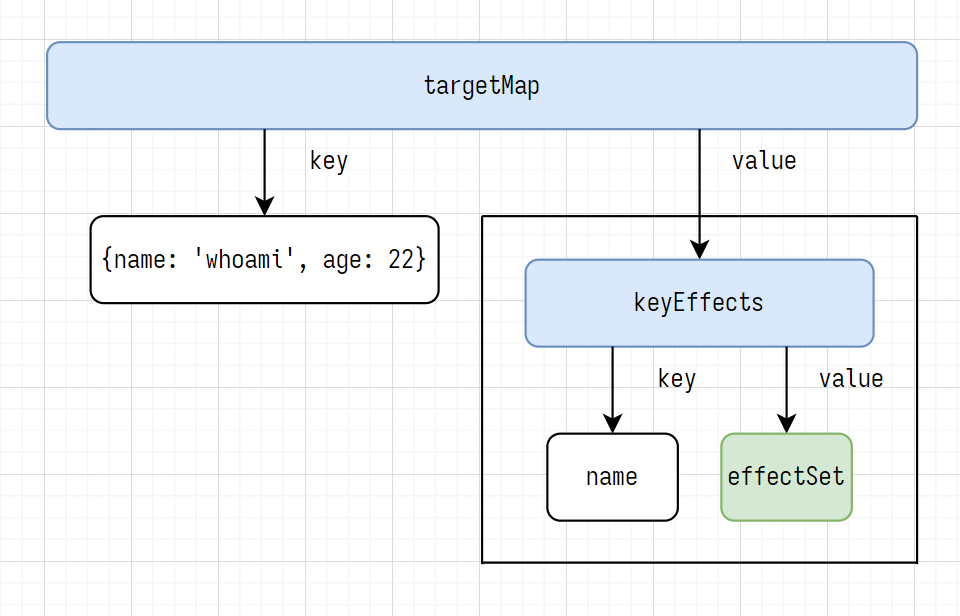
</style>依赖注入 provide/inject
类似的技术: IOC/DI
IoC, Inversion of Control: 不自己 new 对象, 或依赖低层的对象 (即高层 user.controller.ts 中 import { userService } from './user.service.ts' 导入底层 user.service.ts 中的对象), 而是从容器中取对象
DI, Dependency Injection: 不导出对象 export userService, 而是将对象放入容器中
provide/inject: 祖先 provide 给后代, 后代 inject 到祖先, 实现祖孙传参
<script lang="ts" setup>
const colorVal = ref("lightpink");
provide("colorKey" /** key */, colorVal /** value */);
// 也可以提供一个 readonly 的 colorVal, 防止子组件修改
// provide('colorKey', readonly(colorVal))
</script>

<template>
  <div>
    <InjectToParent></InjectToParent>
  </div>
</template><script lang="ts" setup>
const injectedColor = inject<Ref<string>>("colorKey");
</script>
<template>
<div>
<InjectToChild></InjectToChild>
</div>
</template><script lang="ts" setup>
const injectedColor = inject<Ref<string>>(
"colorKey",
ref("lightyellow") /** defaultVal */,
);
</script>
<template>
<div>
<button @click="injectedColor = 'lightyellow'">
Child 修改 Grandparent 注入的颜色
</button>
</div>
</template>兄弟组件通信
方式 1: 通过父组件桥接
通过父组件桥接, 实现兄弟组件通信 (BoyDemo -> ParentBridge -> GirlDemo)
<!-- Boy 组件使用 defineEmits 定义自定义事件 -->
<script lang="ts" setup>
// const emit = defineEmits(['customEvent'])
const emit = defineEmits<{
  customEvent: [flag: boolean, timeStr: string]; // 具名元组
}>();

let flag = false;
function emitArgs() {
  flag = !flag;
  emit("customEvent", flag, new Date().toLocaleTimeString());
}
</script>

<template>
  <div>
    <!-- 点击按钮以触发自定义事件, 向父组件发射参数 -->
    <button @click="emitArgs">emitArgs</button>
  </div>
</template><!-- 父组件中, 为 Boy 组件的自定义事件绑定回调函数,
自定义事件发生时, 接收 Boy 组件发射的参数 -->
<script lang="ts" setup>
const flag = ref<boolean>(false);
const timeStr = ref<string>("方式 1: 通过父组件桥接, 实现兄弟组件通信");
function rxArgs(flag_: boolean, timeStr_: string) {
flag.value = flag_;
timeStr.value = timeStr_;
}
</script>
<template>
<div>
<BoyDemo
@custom-event="(flag: boolean, timeStr: string) => rxArgs(flag, timeStr)"
/>
<!-- 将 Boy 组件发射的参数, 绑定到 Girl 组件的自定义属性 -->
<GirlDemo :flag="flag" :timeStr="timeStr" />
</div>
</template><!-- Girl 组件使用 defineProps 定义自定义属性 -->
<script lang="ts" setup>
defineProps<{
flag: boolean;
timeStr: string;
}>();
</script>
<template>
<div>
<div>flag: {{ flag }}</div>
<div>timeStr: {{ timeStr }}</div>
</div>
</template>方式 2: 事件总线 (手写发布/订阅 pub/sub)
BusBoy 发布, BusGirl 订阅, 不需要父组件参与
<script lang="ts" setup>
import bus from "./bus";

let flag = false;
function emitArgs() {
  flag = !flag;
  bus.publish("customEvent", flag, new Date().toLocaleTimeString()); // 发布
}
</script>

<template>
  <div>
    <button @click="emitArgs">emitArgs</button>
  </div>
</template><script lang="ts" setup>
import bus from "./bus";
const flag = ref(false);
const timeStr = ref("方式 2: 事件总线 (手写发布/订阅 pub/sub)");
bus.subscribe("customEvent", (flag_: boolean, timeStr_: string) => {
flag.value = flag_;
timeStr.value = timeStr_;
});
</script>
<template>
<div>
<div>flag: {{ flag }}</div>
<div>timeStr: {{ timeStr }}</div>
</div>
</template>type IBus = {
publish: (eventType: string) => void;
subscribe: (eventType: string, callback: Function) => void;
};
type TEvName2cbs = {
[key: string | number | symbol]: Array<Function>;
};
class Bus implements IBus {
evName2cbs: TEvName2cbs;
constructor() {
this.evName2cbs = {};
}
// 发布 publish
publish(eventType: string, ...args: any[]): void {
const callbacks = this.evName2cbs[eventType];
callbacks.forEach((cb) => cb.apply(this, args));
}
// 订阅 subscribe
subscribe(eventType: string, fn: Function): void {
const callbacks = this.evName2cbs[eventType] || [];
callbacks.push(fn);
this.evName2cbs[eventType] = callbacks;
}
}
export default new Bus();mitt 发布/订阅库
全局使用 mitt
declare module "vue" {
  export interface ComponentCustomProperties {
    $bus: ReturnType<typeof mitt>;
  }
}
const emitter = mitt();
app.config.globalProperties.$bus = emitter;<script lang="ts" setup>
import { getCurrentInstance } from "vue";
// getCurrentInstance 获取当前组件实例
const publisher = getCurrentInstance();
let flag = false;
function pub() {
flag = !flag;
publisher?.proxy?.$bus.emit("eventType", [
flag,
new Date().toLocaleTimeString(),
]);
}
</script>
<template>
<div>
<button @click="pub">发布</button>
</div>
</template><script lang="ts" setup>
import { getCurrentInstance, ref } from "vue";
const flag = ref(false);
const timeStr = ref("mitt");
const curInstance = getCurrentInstance();
function sub() {
// eventType === "eventType", 订阅指定类型的事件
// 回调函数的第一个参数是发布的参数数组
curInstance?.proxy?.$bus.on("eventType", (args: any) => {
console.log("args:", args);
[flag.value, timeStr.value] = args;
});
// eventType === '*', 订阅所有类型的事件
// 回调函数的第一个参数是事件类型, 第二个参数是发布的参数数组
// curInstance?.proxy?.$bus.on('*', (eventType, args) => {
// console.log("eventType:", eventType);
// console.log("args:", args)
// })
}
function unsub() {
curInstance?.proxy?.$bus.off("eventType");
}
function unsubAll() {
curInstance?.proxy?.$bus.all.clear();
}
</script>
<template>
<div>flag: {{ flag }}, timeStr: {{ timeStr }}</div>
<button @click="sub">订阅</button>
<button @click="unsub">取消订阅</button>
<button @click="unsubAll">取消所有订阅</button>
</template>按需引入 mitt
import mitt from "mitt";
const emitter = mitt();
export default emitter;import emitter from "@/utils/emitter";
// 发布
emitter.emit("event-type", ["arg1", "arg2"]);
// 订阅
emitter.on("event-type", (args: any) => console.log(args));
// 取消订阅
emitter.off("event-type");跨域
- jsonp